Tiny Tomato Kit
TROUBLESHOOTING

INSECTS, INSECTS EVERYWHERE, ON MY PLANTS and in my… hair?
Insects are a truly beneficial part of nature, and live off of many of the same plants and animals that we do. Without insects, we’d be in big trouble, as they are a necessary part of our ecosystem. Insects are not the enemy, but sometimes we just want to eat the same things.
At times though, it might be necessary to intervene if an insect is overwhelming and harming your plant—especially if you find them indoors. It’s unlikely that your indoor tomato plant will attract or harbor harmful insects since it is harder for insects to seek it out. But, it can happen if the plant is sitting in front of an open window, or insects have been tracked in from outside. They can also hitch a ride on other plants, in soil, or even on other foods you’ve brought in from the grocery store.
In some cases outside, beneficial insects and animals will take care of things before you need to, but indoor plants generally don’t attract the good bugs that fight the bad ones, so it might be necessary to intervene.
There are a few common insects that can damage your tomato plant. Here is what to look for, and how to help eliminate the problem:
-
WHAT TO LOOK FOR:
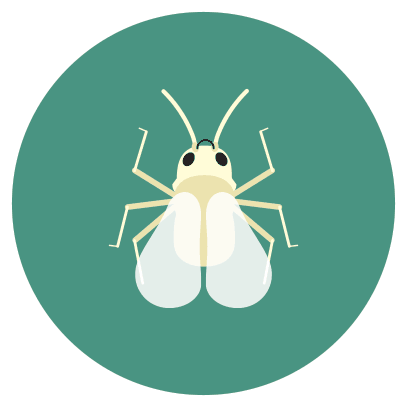
Whiteflies are tiny white bugs, only around 1/16” to 1/10“ long. They tend to appear in clusters on the underside of leaves around the veins of the leaf. The leaves of the plant can start to turn pale or yellow in color, and start to wilt. Though not true flies, the adults do have wings and can fly. Whiteflies are active in the daytime, so you may notice tiny light-colored insects flying around under the leaves.
HOW IT HURTS:
Whiteflies eat the sap from the phloem of tomato leaves. By doing so, they divert sugars and nutrients that the plant needs for photosynthesis. This then harms the plant’s ability to get nutrients and convert sunlight. If left alone, whiteflies can keep your plant from growing and thriving, and also leave the plant exposed to disease.
HOW TO HELP:
It is not recommended to use synthetic or harmful pesticides—especially inside! You don’t want those kinds of chemicals on the food you eat, or to breathe them in if you spray inside your home. Outside, pesticides (including organic ones) can harm beneficial insects such as bees, so it’s best to use sparingly—or try to find other methods.
Use insecticidal soap:
Either buy an organic insecticidal soap, or create your own by combining 2.5 tablespoons of vegetable oil and 2.5 tablespoons of liquid dish soap (such as Dr. Bronner’s Pure-Castile Soap) with 1 gallon of distilled water. Put the soap into a clean and empty spray bottle and spray the entire plant (including both sides of the leaves!) Re-apply if your plant is outside and has been rained on.Use neem oil:
Neem oil is a naturally occurring pesticide created from the seeds of the neem tree. It can be strong smelling and would be better for outside applications. Though Neem is naturally occurring and organic, it can impart a strong flavor onto your plants, so wash extra thoroughly before eating any plants that you’ve sprayed with neem oil. And you may need to re-apply if your plant is outside and has been rained on.Use yellow sticky traps:
You can purchase yellow sticky traps online, through a local home improvement store or plant nursery. These work by trapping flying insects in a sticky substance. Be aware that sticky traps can trap beneficial bugs as well.
-
WHAT TO LOOK FOR:
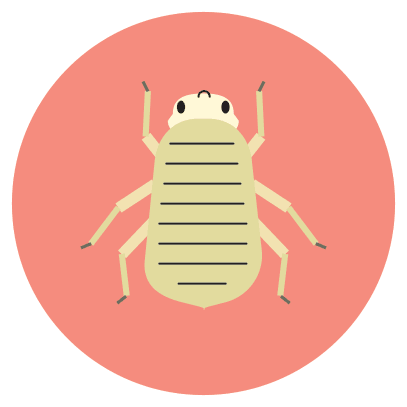
Of all pests, aphids are the ones most likely to appear on indoor plants. They are very small—only around 1/16” to 1/8” long—and can come in many colors, such as pale green, pink, yellow, red, white, and black. Tending to appear in clusters on the underside of leaves, and particularly on young, new, tender leaves, aphids can be winged or wingless, and can be very difficult to spot as they are tiny and often blend in very well with the plant.
Plants can withstand some aphids, but if a particularly bad infestation hits, the plant can start to suffer.
HOW IT HURTS:
Aphids eat the sap from leaves. Tomato plants can usually withstand a number of aphids without affecting the yield of tomatoes, but if they get out of control they can stunt and distort the plants which will affect their ability to thrive. Leaves that the aphids are feeding on can start to yellow or appear distorted, and can even start to drop off.
HOW TO HELP:
It is not recommended to use synthetic or harmful pesticides—especially inside! You don’t want those kinds of chemicals on the food you eat, or to breathe them in if you spray inside your home. Outside, pesticides (including organic ones) can harm beneficial insects such as bees, so it’s best to use sparingly—or try to find other methods.
Spray them off with water:
One of the easiest ways to eliminate aphids is to spray them off of the plant with water. This is easiest to do outside with a hose, but you could carefully attempt this in your kitchen sink if you have a strong sprayer. While a fairly strong spray will be needed to dislodge the aphids, don’t spray so strongly that it harms the plant.Use insecticidal soap:
Either buy an organic insecticidal soap, or create your own by combining 2.5 tablespoons of vegetable oil and 2.5 tablespoons of liquid dish soap (such as Dr. Bronner’s Pure-Castile Soap) with 1 gallon of distilled water. Put the soap into a clean and empty spray bottle and spray the entire plant (including both sides of the leaves!) Re-apply if your plant is outside and has been rained on.Use neem oil:
Neem oil is a naturally occurring pesticide created from the seeds of the neem tree. It can be strong smelling and would be better for outside applications. Though Neem is naturally occurring and organic, it can impart a strong flavor onto your plants, so wash extra thoroughly before eating any plants that you’ve sprayed with neem oil. And you may need to re-apply if your plant is outside and has been rained on.Use beneficial bugs:
If your plants are growing outside, you can introduce or purchase beneficial bugs that like to eat aphids. One such bug is the common ladybug. Just place the package of ladybugs at the base of the infested plants in the evening, ensuring that you’ve sprayed a bit of water on the plant before you open the package. The ladybugs will seek out food and water once they wake up in the morning and leave their container. If food (the aphids!) and water is not available, they’ll fly away before they have time to munch on the aphid population.
-
WHAT TO LOOK FOR:
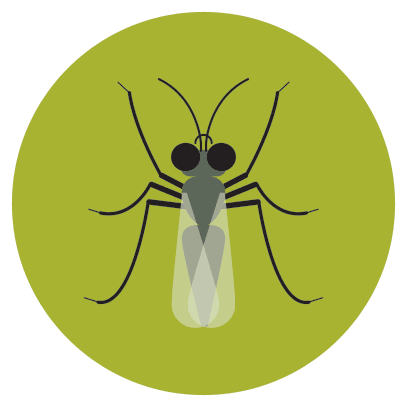
Fungus gnats can be a nuisance both inside and out. Tiny flying insects that slightly resemble a very small mosquito, fungus gnats only grow to about 1/16” long. You may also note their tiny larvae in the soil, which look like very tiny maggots (oh no!). Fungus gnats are easiest to spot when the adults are flying or hopping around on the soil, especially when you water, as that’s when they buzz about the most.
Plants with fungus gnats may suddenly wilt, will appear stunted, or have yellowing leaves.
HOW IT HURTS:
The primary way in which fungus gnats can affect your plant is through their larvae. The larvae feed on the plant’s roots and fungi near the top of the soil. This harms the roots ability to take up nutrients or moisture from the soil effectively. Fungus gnats are especially harmful to young plants and seedlings that do not yet have a vigorous root system established.
Adult fungus gnats only live about 1 week, but they breed quickly (an adult can lay up to 300 eggs in its lifetime!), so it is best to treat as soon as you notice them.
HOW TO HELP:
It is not recommended to use synthetic or harmful pesticides—especially inside! You don’t want those kinds of chemicals on the food you eat, or to breathe them in if you spray inside your home. Outside, pesticides (including organic ones) can harm beneficial insects such as bees, so it’s best to use sparingly—or try to find other methods.
Do not overwater:
Fungus gnats thrive in overly damp soils. Allow plants to dry out a bit between watering. Larvae and eggs will die in dry soils.Use yellow sticky traps:
You can purchase yellow sticky traps online, through a local home improvement store or plant nursery. These work by trapping flying insects in a sticky substance. Be aware that sticky traps can trap beneficial bugs as well.Cover the top of the soil with sand:
A light layer of sand (use horticultural sand, not play sand from your sandbox!) on the top of the soil may prevent adult fungus gnats from laying eggs. This effectively ends their life cycle. Let the sand dry out completely before watering the plant again.Diluted hydrogen peroxide:
Create a mixture of one part 3% hydrogen peroxide to four parts water. You might already have 3% hydrogen peroxide in your house, but be sure it is not a higher percentage than 3%, or of industrial grade, both of which can cause harm. Let the top of the soil dry out for a few days before applying. Water the plant like normal with the hydrogen peroxide mixture, which will eliminate larvae on contact. To get rid of the adults, you can use the same solution to spray the leaves and the plant.
NOTE: be sure that this mixture does not come into contact with furniture or flooring, as it can bleach items in your home. Excessive use of hydrogen peroxide can also strip organic compounds from the soil, so best to use sparingly.
-
WHAT TO LOOK FOR:
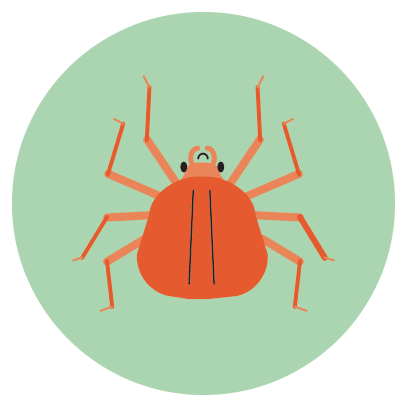
Spider mites look just like their name implies—very very tiny spiders. They only grow to about 1mm, about the size of the period at the end of this sentence. Red, white, tan or black, spider mites have eight legs which makes them an arachnid rather than an insect. Because they are so small they can be hard to spot unless you have a particularly bad infestation.
Like many other arachnids, spider mites actually do have (very tiny!) webs. The webs are generally easier to spot than the mites themselves, as they like to hide on the underside of leaves. Watch for tiny spider webs around the underside of leaves, as well as around joints. This is where they protect their eggs.
HOW IT HURTS:
Spider mites feed on plant tissue and sap. They bite into the leaves and suck out the chlorophyl, stealing nutrients from the plant. Over time, small spots will form. If left untreated, the whole leaf may eventually turn yellow and die. If spider mites are on several leaves, this can be a big problem! Damaged leaves are also weakened, making them susceptible to disease.
HOW TO HELP:
It is not recommended to use synthetic or harmful pesticides—especially inside! You don’t want those kinds of chemicals on the food you eat, or to breathe them in if you spray inside your home. Outside, pesticides (including organic ones) can harm beneficial insects such as bees, so it’s best to use sparingly—or try to find other methods.
Don’t under-water:
Spider mites thrive in overly dry conditions. It can help to keep plants moist (not soggy!)Spray them off with water:
One of the easiest ways to eliminate spider mites is to spray them off of the plant with water. This is easiest to do outside with a hose, but you could carefully attempt this in your kitchen sink if you have a strong sprayer. While a fairly strong spray will be needed to dislodge the spider mites, don’t spray so strongly that it harms the plant.Use neem oil:
Neem oil is a naturally occurring pesticide created from the seeds of the neem tree. It can be strong smelling and would be better for outside applications. Though Neem is naturally occurring and organic, it can impart a strong flavor onto your plants, so wash extra thoroughly before eating any plants that you’ve sprayed with neem oil. And you may need to re-apply if your plant is outside and has been rained on.Use beneficial bugs:
If your plants are growing outside, you can introduce or purchase beneficial bugs that like to eat spider mites. One such bug is the common ladybug. Just place the package of ladybugs at the base of the infested plants in the evening, ensuring that you’ve sprayed a bit of water on the plant before you open the package. The ladybugs will seek out food and water once they leave their container, and if it’s not available, they’ll fly away before they have time to munch on the spider mite population.Use rubbing alcohol:
Soak a cotton swab with rubbing alcohol and dab it under the leaves that are infested with spider mites.
Some tomato insects can be specific to certain regions. Learn about more bugs that might be munching on your tomato plant by having a look here.

PLANTS CAN GET DISEASES?!?
Tomato plants can get sick in a few different ways, ranging from bacteria, to viruses, to fungal infections. Different areas of the US bring different common tomato plant diseases. Indicators of disease include leaf spots, leaves turning brown or looking moldy, and leaves curling.
One of the best ways to deal with tomato diseases is prevention. Tomatoes are more likely to get diseases if they are not well cared for, improperly watered, or are planted in poor soil.
-
Keep the leaves dry
Many tomato plant diseases are transferred from the soil to the leaves and stems by splashing water. To prevent this, water the soil directly and lightly to prevent soil from splashing back up onto the leaves—and do not water the leaves! You can also mulch around the base of the plant with straw, hay, or wood chips to prevent the soil from splashing up onto your plant.
Also, don’t handle your plants when they are wet as that can transfer disease from plant to plant. Be sure to do your pruning and picking when the leaves of your plant are dry.Remove diseased leaves
If you note the beginning signs of disease on your plant, remove any affected leaves to keep it from spreading. Throw any diseased plant material in the garbage, NOT in the compost bin. Also, be sure to wash your hands after, to prevent the spread of the disease to other parts of the plant.Disinfect pots
To prevent disease from appearing in your tomatoes next year, clean pots with a 10% bleach solution at the end of each season, and use new soil.Rotate where your tomatoes are planted
If you plan to plant your tomatoes outside in the ground, change the location in which they are planted each year. Since many tomato plant diseases come from the soil, changing where they are planted can help.Clean pruning tools
If you need to prune or trim your plant, diseases can spread on the surfaces of your pruning shears. Be sure to disinfect your shears or scissors with isopropyl alcohol often to prevent the spread of disease, particularly when cutting into a plant.
If you suspect that your tomato plant has a disease, here a few common ones to look our for:


-
WHAT TO LOOK FOR:
Early blight will typically be found in outdoor plants, and can be caused by two different fungi (Alternaria tomatophila, and Alternaria solani, but you don’t need to remember that!). The fungus overwinters in the soil, and the spores can spread by wind, water, animals, or humans. Rain or poor watering practices can splash the fungus from the soil onto the leaves.
If you have early blight, you may notice it early on (hence the name) in the plant’s life cycle. First signs are brown, concentric round spots (like a bullseye) on the oldest and lowest leaves on the plant. As the disease spreads it moves up the plant towards the top. The spots can grow up to 1/2” in diameter, and the leaf may eventually turn yellow around the brown spots. If not treated or removed, the leaves may turn brown and die entirely, eventually falling off. Early blight is most likely to appear when the temperature is above 75º degrees, under very humid conditions.
HOW IT HURTS:
Early blight does not usually kill tomato plants, but because it affects their health, you may end up with far fewer tomatoes. If the leaves die and fall off, the tomatoes they were shading may get sun scald. If early blight affects the stem of the plant, it can affect the plant’s ability to distribute nutrients to the rest of the plant.
Note: if you feel comfortable, you can still eat tomatoes from a plant with early blight, unless it has affected the tomatoes themselves (brown or diseased spots). As with any food that you grow, be sure to wash thoroughly before preparing or eating.
HOW TO HELP:
Once a plant has early blight, it can be difficult to eliminate. There are a few common things that you can do to prevent it (see Common Ways to Prevent Disease above), but here are a few more things that may help:
Remove the lower leaves
When the plant grows large enough, it can be helpful to prune off the bottom set of leaves, since the fungus can spread from the soil to the plant when watering. Removing the bottom set of leaves can prevent water from splashing back up onto the plant.
Be careful to not remove TOO MANY of the leaves though, as the plant needs leaves to take in energy from the sun. Only cut off the first, or maybe second set of leaves at the bottom of the plant. Micro tomato plants do not grow very tall, so use caution.Remove diseased leaves
Remove any affected leaves to help stop the spread of disease up the plant.
Note: Do not put diseased plants or leaves into your compost, as that can continue the spread of the disease.Remove diseased plants
If you have a number of tomato plants close together, and only one is showing signs of disease, it might be best to isolate or eliminate the diseased plant to prevent the disease from spreading to the others.
Note: Do not put diseased plants or leaves into your compost, as that can continue the spread of the disease.Stake your plant
Staking your plant adds support so that it does not flop over. With micro tomato plants this can be done with a stick, a dowel rod, a chopstick, or any other rigid, tall object that the plant can lean on. Place the support into the soil near the base of the plant. It can be beneficial to do this when the plant is transplanted so that you do not damage the roots. You may need to add supports on more than one side of the plant.
Note: Be sure to not use anything that could add toxins to the soil or your plant, such as some plastics, or things that have been painted etc.
The additional airflow created by staking your plant can help to prevent the humid conditions that allow early blight to thrive and spread.Organic fungicides
If you want to treat an existing infection, you can try to use an organic fungicide. Be sure to do your research to be sure that the fungicide that you select is appropriate for edible plants (you are what you eat!), and will not harm other plants or insects. As with many plant diseases, the best solution is prevention (see Common Ways to Prevent Disease above) or elimination before the disease has a chance to spread.
-
WHAT TO LOOK FOR:
Powdery mildew can be caused by a few different fungi including Oidium neolycopersici, Erysiphe orontii, and Leveillula taurica. Powdery mildew spreads through its spores on the wind, or by insects, animals, or humans inadvertently bringing it from plant to plant.
When powdery mildew first appears, it looks like small yellow spots on the leaves. As it spreads, the leaves will look like they’re covered in a fine, white powder in clumps. This is the spores of the fungus. The leaves can eventually turn brown, die, and fall off of the plant. Powdery mildew tends to spread on plants at the end of the season, or on unhealthy plants, but it can appear at any time.
HOW IT HURTS:Powdery mildew clogs up the leaf pores and prevents the plant from photosynthesizing (converting energy from the sun). This can result in a generally unhealthy plant that will stop growing and eventually die—though this process can take quite a while.
Note: If you notice powdery mildew on your tomato plants inside, it is best to deal with it immediately. If it is allowed to remain in the air, it can cause respiratory issues for individuals that have existing conditions such as asthma.
Note: Opinions vary on whether it is safe to eat fruits and vegetables affected by plants with powdery mildew. Some varieties of powdery mildew can cause allergic reactions in some people. In all cases though, powdery mildew will affect the fruit’s flavor.
HOW TO HELP:There are a few different ways to treat powdery mildew. If treated early, it is possible to severely reduce the spread, or eliminate it entirely.
Skim milk:
While this might seem very odd, research shows that spraying the plant with a solution of 1 part milk to 2 parts water can help with fungal infections on plants. Evidence shows that when milk protein is exposed to sunlight it can create antiseptic properties, which boosts the plant’s immune system to fight off disease. Thoroughly spray the plants weekly.Apple cider vinegar:
The acetic acid of vinegar can kill the spores of powdery mildew. Mix 2–3 Tablespoons of apple cider vinegar with one gallon of water and spray the plant thoroughly. Be aware that in high concentrations the vinegar can burn the plant, so use sparingly.Neem oil:
Neem oil is a naturally occurring pesticide created from the seeds of the neem tree. It can be strong smelling and would be better for outside applications. Though Neem is naturally occurring and organic, it can impart a strong flavor onto your plants, so wash extra thoroughly before eating any plants that you’ve sprayed with neem oil. And you may need to re-apply if your plant is outside and has been rained on.Sulfur spray
Sulfur is an abundant element that’s important for plant health. It can also be a strong fungicide. Be sure to do your research to ensure that whichever spray you select is appropriate for edible plants, and will not harm other plants or insects. Do not spray your plants when it is hotter than 90º outside or during a drought, and do not spray when in direct sunlight (early morning or night time is best.)
-
WHAT TO LOOK FOR:
Verticillium wilt is a fungus that can affect many different plants. The fungus is persistent in the soil and can stay for many many years. The fungus infects the plant through the roots. It thrives in early spring conditions, when the soil is usually wet and moderately warm.
Watch for yellowing lower leaves that eventually turn brown, die, and fall off of the plant. Symptoms will start with the oldest and lowest leaves, and slowly work their way up the plant.
HOW IT HURTS:Verticillium wilt moves its way up the plant from the roots in the soil, slowly cutting off water to the branches and leaves, stunting the plant. A plant may survive an infection for a season, but the plant will be smaller, and will have less fruit.
HOW TO HELP:The best way to deal with verticillium wilt is to avoid it to begin with. If planted outside, rotating where tomato plants are planted each year will prevent the fungus from building up in the soil. Well-drained soil also helps prevent the fungus from spreading.
Unfortunately there are no treatments for verticillium wilt. You can slow the rate of infection by using fertilizers lower in nitrogen, and higher in potassium.
If you feel that you have verticillium wilt on your tomato plants, you should destroy the plants (see note below) and be sure not to plant them in the same location the following year. If your plant is in a pot, dispose of the soil.
Note: While it appears to be safe to continue to eat tomatoes from a plant infected with verticillium wilt (the fungus is specific to plants), make sure to do your own research to determine your comfort level with the safety of eating tomatoes from a diseased plant.
-
WHAT TO LOOK FOR:
Septoria leaf spot is one of the most destructive diseases to affect tomato plants. It is caused by a fungus called septoria lycopersici, and tends to be a problem in areas that are very wet and humid for long periods of time.
Septoria leaf spot will first appear on the lowest leaves of the plant after the first fruits start to grow. The spots are brown and small (about 1/16” to 1/4”) and there are usually many spots on each leaf.
HOW IT HURTS:As septoria leaf spot moves up, it will weaken the plant. As the leaves die and fall off, the tomatoes are exposed to the sun—which can cause sun scald. Plants without enough leaves will also stop producing tomatoes.
HOW TO HELP:Septoria Leaf spot spreads quickly, so it is best to treat it right away. To prevent septoria leaf spot avoid watering the leaves directly. There are a few options for treating this disease:
Remove the infected leaves:
If you note septoria leaf spot on the lowest leaves of the plant, remove them to help prevent spread. Be sure to wash your hands and pruning tools to prevent further spread as well.
Note: Do not put diseased plants or leaves into your compost, as that can continue the spread of the disease.Use an organic fungicidal spray:
You can purchase either copper or potassium bicarbonate fungicide to spray and treat your plant. Read all label instructions carefully and continue to treat as directed.
Find out more about additional tomato diseases, or diseases that might be specific to your area, by taking a look here.

WHAT ELSE COULD GO WRONG?
There are a number of different things that can affect your tomato plants that are not directly related to insects or disease. They often occur with temperature fluctuations, improper/irregular watering, or nutritional imbalances.
-
Blossom end rot looks like a disease, but it is caused by a calcium imbalance in the plant. The bottom of the tomato appears to be “rotting” by turning brown and getting squishy. This can be caused by irregular watering or a nutritional imbalance in the soil that is not allowing the plant to take up enough calcium.
While you may lose a few tomatoes, it is possible to correct. Here are a few things to try:
Maintain consistent moisture in the soil
Apply mulch around the plant to help maintain the soil moisture
Purchase amendments that add calcium to the soil.
Note: Try adjusting your watering first before adding any amendments to your soil—it can be possible to add too much and create other problems.
-
Flowers can drop off of your tomato plant before creating fruit for a few different reasons, one of which is poor pollination. Learn more about helping proper pollination here.
Severe temperature fluctuations can also cause flowers to drop off—a rise above 95º or a drop below 55º. While you may lose out on a few tomatoes, when the situation becomes more stable again they should return!
-
Tomatoes can split and crack pretty easily, and some varieties are more prone than others. Getting too much moisture too quickly after a dry spell can cause this, or if the fruit gets too ripe before picking.
While cracked and split tomatoes may look ugly, they are still edible, unless you notice mold or rot developing.
To help prevent splitting, be sure that the plant receives consistent moisture.
-
Sunscald happens when tomatoes are directly in the sun during hot and dry weather—basically a tomato sunburn. The tomato will look lighter or yellowish where exposed to the sun. Over time, the burned area will start to appear thinner and almost paper-like.
Leaves often provide shade for the tomatoes, but sunscald can become a problem if you’ve needed to remove leaves due to a disease, or pruned for other reasons.
You can still eat tomatoes that have sunscald. Just cut off any affected parts. If the tomato has developed other issues in the affected area, such as mold, discard the tomato.